

Guide
How to Measure for New Windows
Everything you need to measure and specify a replacement window correctly — written to be used on site, with a tape measure in your hand.
Before you start
Measure in Millimetres
All window sizes are worked in millimetres. Measure the structural opening itself — not the existing window frame — and always take the tightest measurement you find.
The rule: find the tightest point, then take 10mm off it. That applies to both the width and the height, and it gives the fitting tolerance the window needs to go into the opening.
At a glance
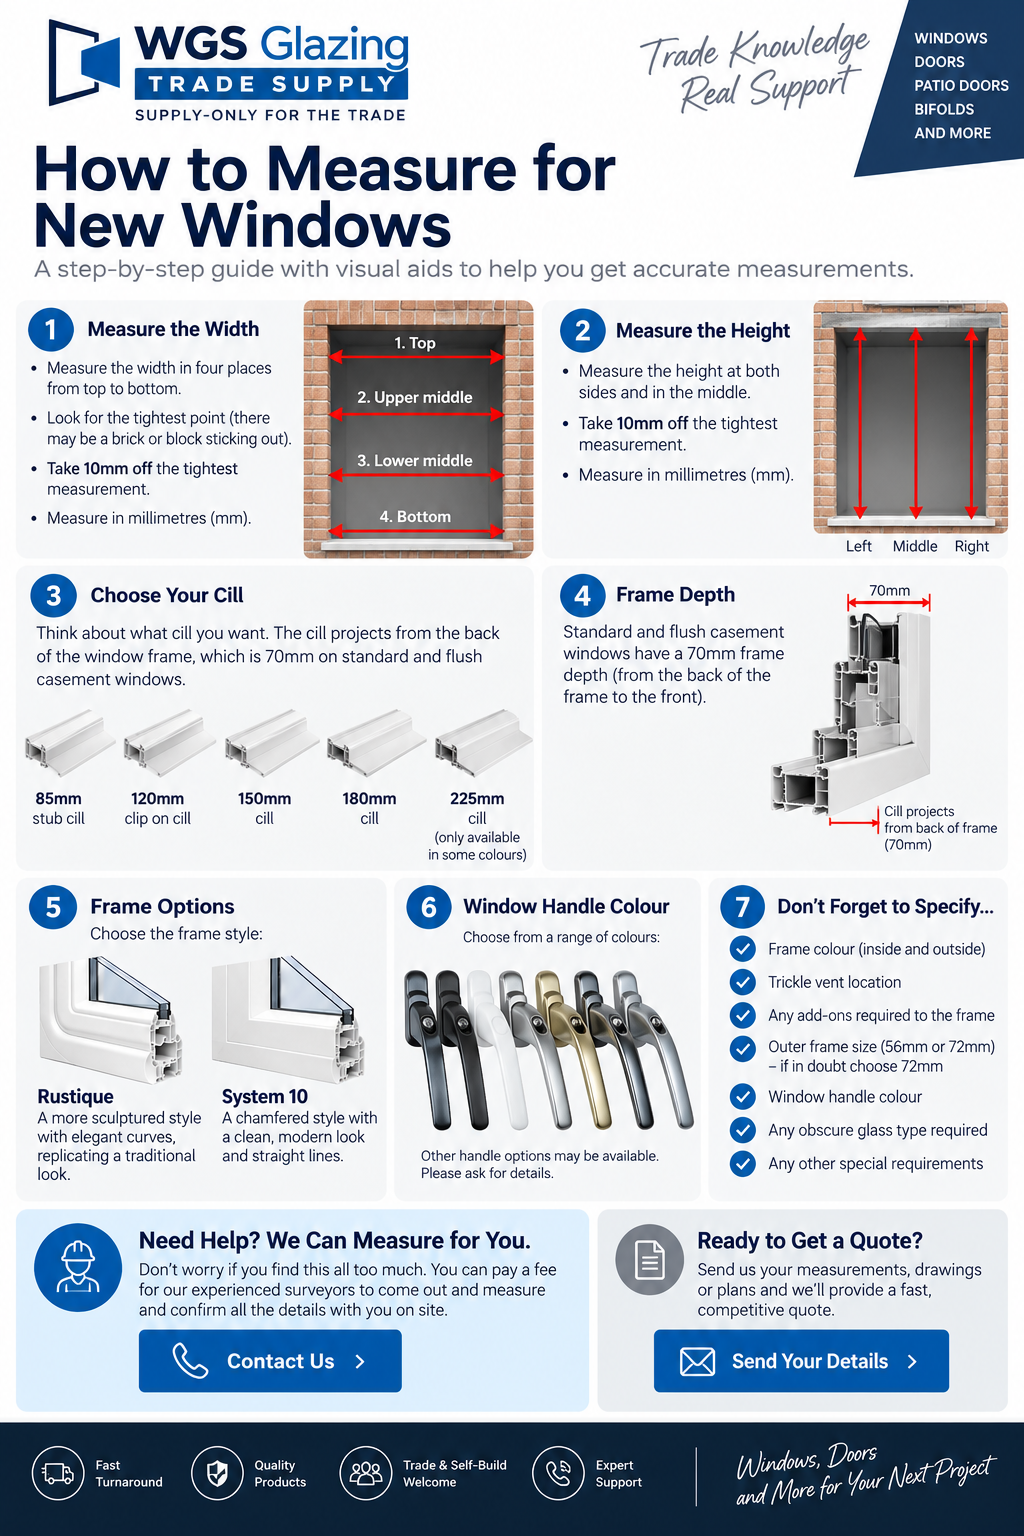
Quick Visual Measuring Guide
The whole guide on one page — tap the image to open it full size, or download it to take on site.
Step 1
Measuring the Width
- 1Measure the width in four places, working from the top of the opening down to the bottom.
- 2Look carefully for the tightest point — a brick or block sticking out into the opening is common and will catch you out if you miss it.
- 3Take the smallest of your four measurements.
- 4Take 10mm off that tightest measurement. That is your window width.
Example: your four widths are 1204, 1201, 1188 and 1199mm. The tightest is 1188mm, so the window width is 1178mm.
Four width measurements taken top to bottom. Measurement 3 here is tight because of a projecting brick.
Step 2
Measuring the Height
- 1Measure the height at the left-hand side, in the middle, and at the right-hand side.
- 2Take the smallest of your three measurements.
- 3Take 10mm off that tightest measurement. That is your window height.
Example: 1052, 1049 and 1055mm. The tightest is 1049mm, so the window height is 1039mm.
Three height measurements — left side, middle, right side.
Step 3
Choosing the Cill
The cill projects out from the back of the window frame. The standard flush casement frame depth is 70mm, so the cill size you choose determines how far the finished cill sits proud of the frame.
85mm
Stub cill
The shallowest option.
120mm
Clip-on cill
Clips on to the frame.
150mm
Cill
A common replacement depth.
180mm
Cill
For deeper reveals.
225mm
Cill
The deepest option — only available in some colours.
Measure the depth you need from the back of the window frame outwards, then pick the nearest cill size that covers it.
The 225mm cill is only available in some colours — if you need it in a colour other than white, check with us before you commit to it.
If the window is not going onto a cill at all, tell us and we will price it without one.
Step 4
Specification Checklist
Sizes alone are not enough to manufacture a window. Send these details with your measurements and we can price the job without going back and forth.
Frame colour inside and outside
Tell us both faces — inside and outside can be different (dual colour).
Trickle vent location
Confirm whether vents are required and where they should sit on the frame.
Any add-ons to the frame
Extensions, couplers, variable corner posts, bay poles or anything else added to the outer frame.
Outer frame size — 56mm or 72mm
If you are in any doubt, choose 72mm.
Window handle colour
Hardware finish to match the frame or the rest of the job.
Obscure glass type
Which pattern and privacy level, and which openings it applies to.
Any other special requirements
Egress hinges, restrictors, toughened or laminated glass, georgian bars, or anything unusual about the opening.
Step 5
Choosing the Frame Style
Two VEKA profile looks cover most jobs. The difference is the shape of the profile edge, so it is worth deciding before you order — mixing the two on one property is noticeable.
VEKA Rustique
Sculptured / traditional styling
Softer, shaped profile lines — the traditional look most often specified on older and character properties.
VEKA System 10
Chamfered / cleaner straight-line styling
A chamfered profile with cleaner, straighter sightlines — the more contemporary of the two looks.
Profile drawings and photographs for both systems are in the genuine VEKA technical leaflets linked on the windows page and in brochures & guides.
Need Help? Contact Us.
If measuring and specifying feels like too much to take on, you do not have to do it yourself. For a fee, an experienced WGS surveyor can visit the property, measure the openings and confirm the details on site before anything is ordered. Get in touch and we will explain what is involved and what it costs.
Next step
Ready to Get a Quote?
Send your sizes and specification — or your drawings, schedule or photos — and we will price it as a supply-only trade order.